It has been a crazy last couple of years in the firearms industry…
It’s great that more people have guns. And it’s great that more people have concealed carry permits. But in most cases, those classes mainly cover when and where you can legally carry and when you can legally shoot.
There may be some head knowledge and a few reps on the actual skill of shooting, but they hardly qualify as “training.”
In the crawl-walk-run learning progression, getting a gun and going through a concealed carry permit class is usually about the same level as a baby getting up on it’s hands and knees for his first time.
It’s exciting.
Everyone around should cheer.
Everyone should do it.
But everyone should appreciate it for what it is…a beginning step and not the end goal.
If you’re like most shooters, you know this and are on a constant quest to master your craft so that if you ever need to defend yourself, you’ll be ready. So, today, I’m going to share 2 drills with you from Dry Fire Training Cards/21 Day Alpha Shooter and Dry Fire Fit.
But first, a quick disclaimer: Dry Fire is practicing all of the steps of shooting with NO LIVE AMMO PRESENT. Remember, guns are designed to project extreme force at a distance. Just so we’re on the same page, NEVER do these drills with a firearm capable of firing projectiles. These drills are designed to supplement live training. Consult your medical professional before doing any exercise. The user of these drills assumes all liability for their actions and holds the creator and contributors of these cards harmless. These cards are for educational purposes only and it is your responsibility to verify that their content is safe and legal for you to do before attempting. I suggest using a Dry Fire Pistol from SIRT, Dry Fire Cord, or some other safer-dry-fire-training-tool.
The first drill is based on the “Duck/Groucho Walk” card from 21 Day Alpha Shooter & Dry Fire Training Cards and it’s the foundation of taking your
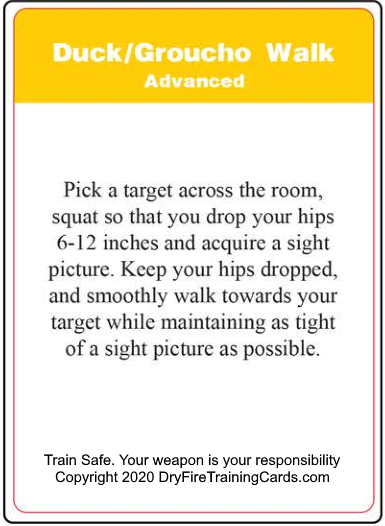
stationary shooting skills and executing them on the move. You can do it with a training pistol, with a camera phone, or a full cup of coffee/tea.
It’s somewhat of an advanced drill, but the ability to do the drill with a camera phone means that almost anyone can do it while they’re taking a break at work and not cause any problems.
- Pick a target across the room and aim your pistol at it.
- Squat so that you drop your hips 6-12”, keeping your torso upright and your sights in alignment.
- Keep your hips dropped and smoothly walk towards your target while minimizing the wobble of your sights. When you get 2-3 feet away from the target, stop and walk in reverse.
A couple of big helpful tips on this one…
First off, when you squat, I want you to visualize a set of railroad tracks on each side of your hips going between you and your target.
You have an axle coming out the sides of your hips with wheels on them that are riding on the tracks. This will allow you to go forward and backwards effortlessly, but you won’t be able to move up and down or side to side. Simply ride the rails and your target will just get bigger as you move closer. Any wobble of the sights means that you’re fighting the rails and adding unwanted vertical or lateral movement of your torso.
This isn’t something that most people can do without practice. The brain has to learn how to send the right electrical impulses to the muscles at the right time to do what you want them to do, so be patient and go as slow as you need to to stay on the rail.
One thing you can do to measure your improvement is to use a metronome.
Here’s 2 ways to do this…first is to step and shoot with each beep.
The 2nd way is to alternate stepping and shooting.
Do what works best for you.
As you speed up, you’ll reach a point where you just ride the rails and shoot without needing to focus on timing your steps and your shots. The most common feedback you’ll get at this point is that you look like you’re floating or dancing. We get people to that state VERY quickly the Praxis Gunfight Training.
The second tip is to practice this throughout the day with the camera on your phone. You don’t even need to use the video feature…just focus on keeping the screen centered on your target as you move back and forth in whatever room you’re in. If you need a quick excuse for what you’re doing, say you’re practicing being able to move smoothly for shooting video.
Do this back-and-forth drill for 5 sets of 1 minute each with a 30 second break between sets with either a pistol or with a camera phone. If your performance drops off, slow down or stop doing the drill immediately and come back to it later in the day. Only do the drill as long as you can execute it at a high level…you don’t want to practice for the sake of practice and ingrain sloppy performance.
As you get more and more comfortable with this drill, make the following modification:
Begin the drill by standing relaxed, with your arms at your side and pistol holstered. Drop your hips and start moving forward or backwards as you draw your pistol and engage the target. Alternate between starting with forward movement and backwards movement.
Once you are comfortable doing this drill forwards and backwards and moving at a fast pace, begin working side to side and at various angles. This won’t happen the first day you start doing the drill, but will happen eventually.
For more dry fire drills that cover fundamentals, advanced skills, low light drills, and exercise based drills, check out 21 Day Alpha Shooter which includes a set of Dry Fire Training Cards.
The next drill is from the “Tic-Tac-Toe Aiming” drill from Red Dot Drill Cards
“Imagine a large tic-tac-toe board floating in the air in front of you with the middle square straight ahead.
Get a sight picture while aiming in each of the 9 squares, then practice transitions from square to square, increasing the size of the imaginary board.”

This comes from the fact that humans have 9 distinct fields of view, depending on which way their eyes are pointed in relation to their face.
There are perceptual distortions in each of these fields of view that can happen…especially when wearing corrective lenses.
You’ll even notice that eye dominance changes when your nose gets between your dominant eye and the target.
In rare cases, just looking up or down can shift eye dominance.
These simple shifts in orientation and sight picture are enough to throw people for a loop the first few times they try it…and you want that learning to happen with dry fire and not when you find yourself in a fight for your life.
For more advanced, dynamic, 360 degree dry fire drills that will stretch you as a shooter and help you make accurate shots while moving, from the ground, and from awkward, unstable positions like what happen in real gunfights, you’ll want to check out Red Dot Drill Cards
These are drills…great drills…but drills are not comprehensive training. For comprehensive training on dynamic stress shooting combined with decision making, check out the Praxis Gunfight Training.
Questions? Comments? Let me know by commenting below.
7 Comments
Cindy Lowe
January 1, 2021David Hartman Reply ReplyFebruary 8, 2016
“What if you’re disabled and are confined to a motorized wheelchair (power chair)?”
In my humble opinion, it would still be better if you could get to the floor and even get someone at home (kids, friends, etc.)to help you learn how to get to the floor safely. It would be a shame to be sitting there with no way to get out of harm’s way.
Since you are in a wheelchair I assume you are connected to some physical therapist that could maybe help you learn how to roll out of you chair, scooter, or whatever it is that you are using.
Good luck to you in figuring this out. Hope I got you thinking enough to figure out the answers.
John Gaddis
January 2, 2020Shooting “Jackass” is a tactical advantage skill that all should practice without a doubt. My brother and I have played ” do this ” and ” call your shot ” for years. Those were the type of things that put our skills with point shooting over the top.
One thing that helped allot was Martial Arts and ground fighting in the style of Ju’do.
For those without martial training the library should have books with pictures and explanations on how to Tumble from a standing or running positions. Probably a modified sitting position also in the Gymnastics area.
They will teach a person the proper manner in which to run jump roll and layout flat without hurting themselves. Three or four shipping blankets layered on the ground next to a chair should be enough for most to tumble safely. If not add a crib mattress
At the initial impact point.
Anyway just some thoughts that might help.
herman
January 11, 2017At my training facility, I have a portion of one course called “awkward shooting positions”. The client starts by assuming an awkward shooting position laying on the ground and practicing. Then the lesson progresses to leaving a sitting position (a chair) and “rolling” into the awkward position and engaging one or more targets. We use SIRT pistols and furniture props. This is popular with the clients and useful as your article articulates. Keep up the good work
Frank Salisz
January 11, 2017I have used both dry fire training cards and the SIRT system. Trust me, the SIRT is well worth the investment. You don’t have to take the time to drive to the range, wait for a range position and be hampered by limitations to drawing from concealed. In the first time with the SIRT gun in my living room,I shaved my time in half, properly drawing from concealed and pulling my groups tighter. I do need to work more with the dry fire cards though as the exercises provide more flexibility to actual events than just a draw and shoot scenario.
Disclaimer: I’m not a spokes person, employee or member of either company, just a responsible citizen wanting to do it right.
David Hartman
February 8, 2016What if you’re disabled and are confined to a motorized wheelchair (power chair)?
Marcus Pickett
January 8, 2016As quick as gunfights are, if you’re lucky enough to draw and present your firearm– if you have one, most just pop off rounds at a standing position. Work on the actions and purchase the cards. You never know, you might be at home jumping out of bed sweeping the house in any particular scenario. It helps to be trained and prepared, and to break from training for reluctance.
Tom Westbrook
January 8, 2016Good information. Thanks for this consistently relevant and reliable information!
Leave A Response To Frank Salisz Cancel reply