Instructions for the Patented and deceptively simple
“9mm Dry Fire Cord”
DryFireCord.com
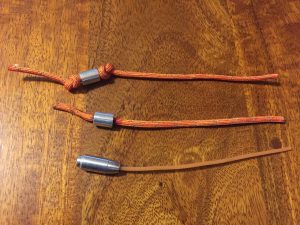
I want to tell you about a ridiculously simple invention called “Dry Fire Cord.” Here are 3 versions of it:
I’m going to tell you why you want one and, even though it’s patented, how to make your own.
First off, here are the advantages…
- Dry Fire Cord holds a Glock out of battery enough to give you a resetting trigger without racking the slide. There’s no take up, wall, or trigger break, but you can articulate the trigger through it’s full range of motion. This allows you to practice multiple shot strings during dry fire without racking the slide between trigger presses.
- The Dry Fire Cord spacer blocks the chamber to make it very difficult to introduce a live 9mm round into a 9mm chamber during dry fire practice. All firearms accidents and negligence are the responsibility of the person handling the firearm. Handling a firearm will never be completely safe, by design, as firearms are designed to project kinetic force at a distance, but dry fire cord + removing all live ammo from the dry fire training area + following the 4 rules of firearms safety is an excellent start.
- Dry Fire Cord is a visible blocked chamber indicator at both the muzzle end and ejection port
- Dry Fire Cord can be inserted/removed without having to press the trigger or remove the slide.
- Dry Fire Cord will hold the slide far enough out of battery on a 1911 style pistol to let you articulate the trigger through it’s full range of motion while dry firing (although the safety will not engage)
- Dry Fire Cord will hold the slide far enough out of battery on SA/DA pistols so that you can articulate the trigger multiple times in double action mode without having to rack the slide or cock the hammer.
What it is: Dry Fire Cord is a combination of 3 things…
- If you ever stuck a piece of cardboard in your ejection port to give yourself a resetting trigger, you’re familiar with part of the concept. Cardboard in the ejection port has some significant issues with premature wear on the trigger mechanism unless you keep the slide far enough out of battery.
- Putting 550 cord in the ejection port and out the muzzle is as old of a dry fire tool as dirt but could allow a smaller round to be negligently chambered in a larger caliber gun.
- Blocking the chamber or replacing the barrel so that live ammo can’t be introduced is ideal, but, with the exception of Barrel Blok, you have to remove the slide to insert them.
In it’s simplest form, Dry Fire Cord is a 7-8” length of paracord (I use bright, reflective, 700 pound paracord instead of 550) with a ½” long nylon or aluminum spacer. If you tie knots instead of epoxying the spacer in place, you want 11″ of paracord.
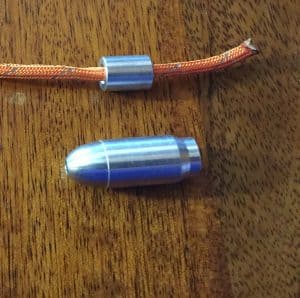
For 9mm, you want to use a 3/8” spacer. M10 for .40 and 7/16 for .45. 3/8 is the only size that’s readily available commercially and the spacers for .40 and .45 cost 30x-50x more to have custom made, like this .45 version shown below the 9mm version:
The best way that I’ve found so far to affix the cord to the spacer without preparation is Gorilla Epoxy.
The simplest way to affix the cord to the spacer without preparation is a knot in front of the spacer that goes into the barrel to make it easy to remove the spacer from the chamber. You can put a knot on both sides of the spacer as well, like I show in the top picture.
How to make one: As simple as it is, Dry Fire Cord is patented. You may not sell them or claim the design as your own. You may make your own for non-commercial purposes and if you give them away, it would be very honorable to mention that you heard about them through DryFireTrainingCards.com and that there’s a guy who goes by the name “Ox” who comes out with some really cool training tools and methods. ?
If your department, unit, or school decides to use them or if you’re an instructor and use them in classes, contact me for additional training materials.
I suggest starting with a 7” length of paracord if you’re using epoxy and a 11” length if you’re using knots. Finish the ends with a hot knife, match, or lighter so they don’t fray.
Slide the correct sized spacer for your pistol onto the paracord.
Lock the slide of your pistol to the rear.
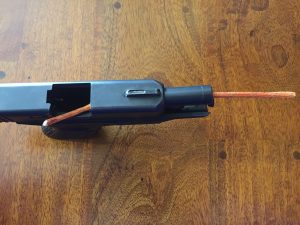
Insert one end of the cord into the ejection port, through the chamber, down the barrel, and out the muzzle.
Adjust the cord and the spacer so that the spacer is in the chamber, there’s ½” or more paracord sticking out of the end of the muzzle, and the back end of the paracord is touching the outside edge of the ejection port. For a Glock 9mm, it means about 1 5/8″ of paracord behind the spacer.
If you’re using knots, leave the cord long enough so that it comes out the end of the muzzle before the knot goes into the barrel. That way you can pull the spacer into the muzzle. You don’t need to do this if you are using epoxy
Trim and finish the cord to your taste. If you’re going to use it in multiple pistols, cut it for the one with the longest barrel.
Over time, the cord will develop a bend (which you can make permanent with a touch of flame, epoxy, or superglue) and you can trim a little more off of the back end.
How to use:
Again, the manipulation of a firearm is dangerous by design. Dry Fire Cord can help you be safer, but it can not eliminate the possibility of all accidents or negligent actions. You must remove all live ammo from your training area, follow the 4 rules of firearms safety, and understand that you are responsible for your actions.
By using dry fire cord, you assume all responsibility for the use or misuse of the product and hold the makers and promoters of dry fire cord harmless. It’s possible that you could use Dry Fire Cord in a way that damages your pistol, you, or people around you. You assume all responsibility for damage to yourself, your pistol, or anyone or anything else while using Dry Fire Cord.
Dry Fire Cord is caliber specific and damage, injury, or death could result from misuse.
Dry Fire Cord is not perfect but it is the cheapest, easiest, and quickest way to make dry fire with a real pistol safer.
To use, remove all live ammo from your training area and simply lock your slide to the rear, and insert the long end of the cord into the chamber through the ejection port until the cord comes out the muzzle. If you’re using a 3/8″ spacer, verify that you’re using a 9mm pistol.
Lightly tug on the cord coming out the muzzle to seat the spacer in the chamber.
Make sure that the short end of the cord is coming out of the ejection port and gently ride the slide forward until it hits the cord and stops moving.
Verify that you can see the cord sticking out of the muzzle AND the ejection port.
Aim at a safe backstop and press the trigger a few times, then begin your dry fire practice.
It’s important to note that if you want it to last as long as possible, ride the slide forward gently.
If you don’t mind replacing your dry fire cord more often, use the slide release, power stroke, or use your method of choice to let the slide fly forward…just know that in a game of steel vs. paracord, steel wins over time—sometimes very quickly.
Dry Fire Cord works best for practicing drawstroke, trigger finger isolation, transitions, vision drills, and other skills where you don’t need to rack the slide. These are the majority of the skills that you’ll need in a real life defensive pistol situation.
I don’t suggest using Dry Fire Cord for reloads or malfunction drills. Why? Because the slide slamming forward will cut through the cord fairly quickly. There are ways to make it work for drills where you’re going to run the slide, but it’s a little more involved. (basically, you gut the cord, replace it with weed whacker cord, and cut off the cord behind the spacer. The bend and stiffness of the weed whacker cord helps keep the spacer from coming out of the chamber and allows you to “push” the spacer out of the chamber easier when you’re done practicing.)
9mm Dry Fire Cord Kits:
We ship 9mm dry fire cord kits as a part of some packages. (As of March15th, this includes Private Video Coaching.) And if you sign up for the “Upgraded Shooter Community” right now, we’ll send a kit out to you for FREE! They come with an aluminum spacer and 700 pound (thick/dense) reflective paracord. This is a significant upgrade over what you can put together with parts you can find at a local hardware store.
If you make your Dry Fire Cord using a nylon or polyethylene spacer, make sure to check it before and after each use. Again, in a fight of steel vs. nylon or polyethylene, steel wins…especially if you let the slide go forward with full force.
Some people wonder why we ship them as a kit instead of as completed and why we don’t sell them on their own. There’s a few reasons…
First, I think most people have epoxy and 5 minutes to complete the dry fire cord and would rather do that than pay us to.
Second, and most importantly, people do incredibly stupid things. I want people to have taken the action to actually make dry fire cord so that they have 100% responsibility for it’s use and potential misuse.
Third, on why we don’t sell them on their own–we might. But for right now, the cost of shipping and handling is so much more than the cost of the Dry Fire Cord that we’re just including them with selected training packages.
So, get on over to your local hardware store to make yours this weekend or sign up for Private Video Coaching or Upgraded Shooter and we’ll send a kit out to you.
Questions? Comments? Suggestions? Fire away by commenting below:
11 Comments
Harry Orenstein
September 13, 2018Hi Ox,
But for a DA/DA, Sig Sauer P226 Mk1, what would you do?
Would the Dry Fire Cord work?
Harry
Ox
September 13, 2018Hey Henry, I’m not sure which method of replying will get back with you quickest, so I’m using both…I don’t know on the 226, but on the 220, it gives you a resetting trigger press without the click that’s closer to the DA trigger press than the SA. And, of course, it gives you a visual indication that the chamber is blocked.
Ken Bucher
March 16, 2018Very useful article. I only don’t understand one thing – “There’s no take up, wall, or trigger break, but you can articulate the trigger through it’s full range of motion.”
What is “wall” ?
Ox
March 16, 2018I think I’m going to have to draw this for it to fully make sense, but here’s a stab at it with a written explanation.
If you think of a graph of the resistance of the trigger and the force required to move the trigger as you’re pressing it, there’s a period where there’s very little resistance…that’s the take-up. Then, there will be a spot where the pressure increases rapidly. On a single action, this is quick. On a double action, it’s longer, but still a marked difference from what the take-up feels like. This increase in pressure/resistance, if you graph it, looks like a steep slope or wall.
left coast chuck
March 16, 2018It would be a simple matter to just enlarge the hole in the primer cup to hold the paranoid.
Ox
March 16, 2018I can verify that using a deprimed & drilled case does work. There are 2 reasons why I don’t recommend it.
1. I want dry fire tools to look dramatically different from live fire tools. There are a lot of things that people think are too easy to screw up…right up until they screw them up.
2. On the CNC’d version, you’ll notice that it’s rimless. That’s so that the extractor doesn’t extract the chamber plug when you rack the slide. I ran into that problem when I initially switched from using spacers to using deprimed & drilled cases. This is only a problem if you use it without the tail coming out the back end for malfunction and reload drills. If the tail is coming out the back end, it’s not a problem, but it MIGHT take your slide further out of battery than you’d like for personal taste.
left coast chuck
March 16, 2018Ox: If you want your cases to look different, red fingernail polish or any color fingernail polish will certainly accomplish that. I used to paint the base of my cartridges with fingernail polish when I fired National Match so that I could collect my brass. Many shooters did the same thing. Wasn’t unusual to hear “Whose brass is painted green?”
That’s also helpful if you are trying out different loads and want to differentiate which ones are which when you are loading. Green= 7 grains of Unique. Purple= 6.7 grains, etc etc. Used to use Testor’s model paint but you don’t see it in stores any more, so next best thing is fingernail polish. Back when every young boy was making models, instead of playing video games every drug, hardware and variety store carried a rack of Testor’s model paint. It was very handy for other purposes too.
Ox
March 16, 2018You know, I see that all the time at matches…different combinations of 1, 2, or even 3 stripes, but I don’t get using fingernail polish because of introducing bits that flake off into the chamber/barrel.
left coast chuck
March 16, 2018Jackie Wright: Why not just knock the primer out of the appropriate case and drill out the primer pocket to take the paranoid? I make snap caps for my revolvers by knocking the primer out and filling the case with white silicon seal. I fill the case with enough seal so that it leaks out the primer hole and fills the primer cup. Then after it has dried I cut it flush with the case head so that the firing pin impacts the silicone in the primer cup. I can tell in an instant that the case is a dummy by the while silicone at both ends of the case. It would be a simple matter to just enlarge the car to hold the paranoid. Instead of silicone sealant you could use epoxy glue. if the cord breaks it is a simple matter to make a new one.
left coast chuck
March 16, 2018Will this device work in a firearm that has a magazine disconnect? In the PDRC semi-automatic pistols can only be sold if among other safety devices they have a magazine dis
Ox
March 16, 2018I don’t know. You can use it with a magazine inserted, so it shouldn’t be a problem on a pistol with a magazine disconnect.
Leave A Response To Ox Cancel reply