Red dot sights on pistols, also called micro red dots or micro red dot sights (MDRS), are all the rage right now for defensive use after proving their effectiveness in the shooting sports for the last few decades.
They are almost as big of a game-changer on pistols as they were on long guns.
On most targets, you can keep your focus on your target, put the red dot where you want your bullet to go, and the bullet will go there (instead of lining up the front and rear sight and having to shift your focus to the front sight).
They negate many of the aiming advantages of a longer slide, make shooting easier for shooters with visual confusion (seeing ghost images when aiming with both eyes open) and they can be easier to track in recoil than iron sights.
When you just look at accuracy (and not speed), red dots make a huge difference. As long as you can press the trigger without disturbing the muzzle, it’s just ridiculously simple to shoot tight groups with a red dot and to shoot accurately at much longer distances.
When you add speed to the equation, the game changes… Red dots reward precise irons technique and add a severe time penalty for deviations from precise technique. And for a lot of shooters, the technique that gets their dot to show up when they draw from the holster is different than when they’re presenting from low ready, high compressed ready, and Sul.
Red dots tend to help top shooters shoot 10%-20% better (speed/accuracy) but actually cause many novice to intermediate shooters to shoot slower, until they go through a steep learning curve. (I’m going to tell you how to fix that)
I have used red dots on pistols for 5-6 years, but until a year or two ago, it was primarily for plinking with fun guns with my boys and with brand new shooters who are touching a gun for the first time.
But, a red dot just didn’t have a place for me on a serious gun because of a few unique…almost primadonna…requirements that I had.
- Red dots on pistols are notorious for having a steep learning curve. I wanted zero learning curve and to be able to take advantage of the highly refined draw stroke and presentation that I already had.
- I didn’t want to lose any of my ability to do sighted shooting with irons. In fact, this is a bigger deal than many people realize and significant practice should be done with iron sights even if/after you switch to a red dot.
- I wanted to be able to blindly draw any Glock, use the exact same presentation, and have the sights or dot come up into automatic alignment between my dominant eye and the target without any lag.
This can be a big deal if you have multiple pistols in the same family but don’t want to (or can’t afford) to get red dots for all of them at once. Switching to a red dot may mean that some of your holsters no longer work. Also, if you happen to carry muzzle down in a shoulder holster as a deep concealment method (as I do), the bump of a red dot is very visible from behind.
- I wanted a red dot on my carry gun but couldn’t justify getting one on my SIRTs, airsoft trainers, paintball trainers, and CO2 trainers…so I needed a setup that would allow me to do the majority of my practice with irons and get 100% of the benefit when I shot my pistol with the red dot.
So, basically, I wanted all of the advantages of a red dot with zero learning curve and none of the drawbacks that are typical of switching from irons to a red dot.
When I see a skill where most people are failing/struggling and a few have no issues, my default is to reverse engineer the process, identify the critical factors, test hypotheses, and then roll stuff out that makes things easy/easier for “most.”
In this case, I identified the factors, stacked the odds in my favor, and went from not shooting a red dot to putting one on my carry gun on a Saturday, making sure I could hit steel with it for a few rounds, purposely NOT doing rapid fire or dry fire reps, and shooting a match the next day.
I was able to draw and engage quickly and shoot -0 body & head shots with .2-.25 splits on the move and around cover with my Glock 26.
Absolutely zero learning curve…but that’s because of what I did ahead of the switch and how I set up my optic.
For some people, this is going to be old news…for most, it will be very helpful and save a TON of wasted time and frustration.
The 2 key factors are:
- Co-witnessing
- Up+out presentation that automatically lines up the sights between the dominant eye and the target.
Let’s start with co-witnessing.
Co-witnessing is simply having both your iron sights and your red dot visible and usable at the same time without needing to move your dominant eye or the gun.
With red dot sights on a pistol you’d carry, you can mount the red dot to the slide using the rear dovetail, or have a notch cut out of the slide that the red dot base goes into. These notches can be shallow or deep, depending on your preference.
You can also mount the red dot to the frame for sport shooting, but that’s another conversation.
Here I’ve got a Glock 19 with a dovetail mount on top, which I wouldn’t recommend, and a Glock 26 with a Lone Wolf slide cut on the bottom (co-witnessed).
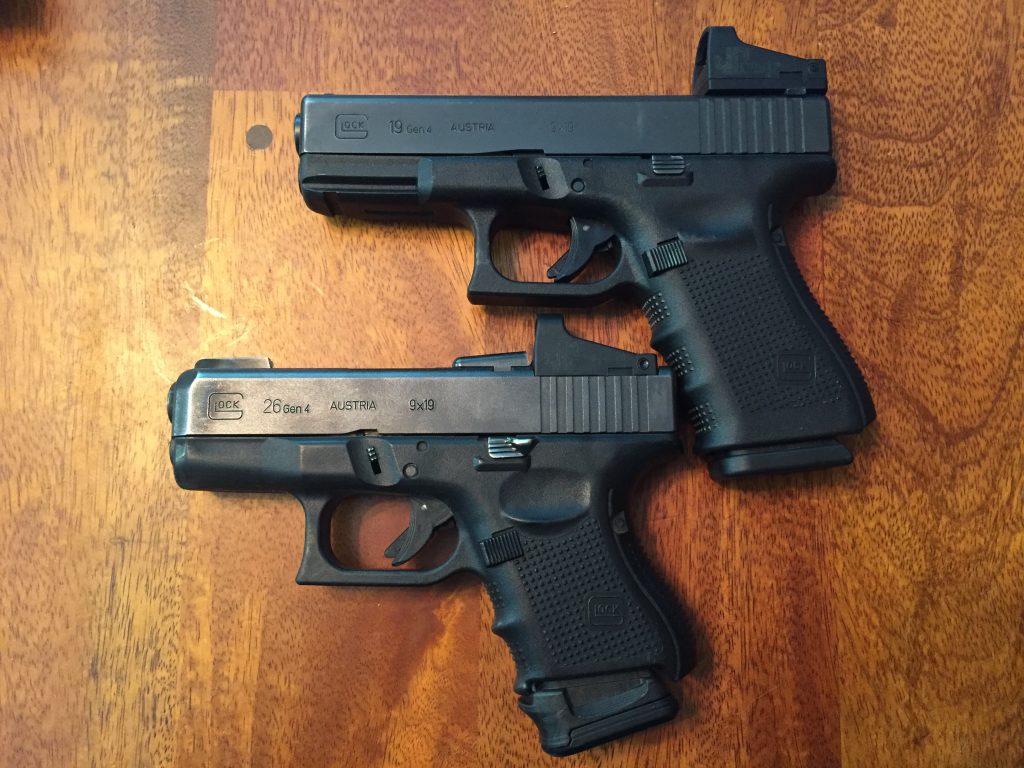
With the dovetail mount, the dot ends up much higher than factory height sights…enough that you won’t be able to see the dot at all with a presentation that brings your sights into alignment. That means 2 different presentation methods depending on whether you’re using a pistol with irons or a red dot. The dovetail mount also seems a little fragile for anything other than a range toy.
Again, if you can keep your presentation exactly the same, regardless of whether you’re using a red dot or irons, you’re going to build skill quicker and easier AND you’re going to have a more seamless transition from irons to red dot.
With a cut slide and a dot that sits low, you can see and use either your factory height sights or the red dot at the exact same time.
A lot of people put suppressor height sights on their pistols so they can use both their red dot and irons…I have done that on my Sig P220, but won’t do it on my Glock.
Why?
Again, it’s because I want consistency in my presentation, regardless of which of my Glocks I’m drawing or whether I’m drawing one of my non-gun trainers. That means that I either switch the sights on every single one or I keep them all at factory sight height.
The 2nd big factor has to do with the fact that a red dot rewards a presentation that automatically places the sights or dot between your dominant eye and the target and penalizes a non-perfect presentation.
With iron sights, when your sights are off, you can look at the front and rear sights and figure out which direction you need to move the gun to get them into alignment.
With MOST red dots, if you can’t see the red dot, you may have no idea which way you need to move the gun to make the red dot visible without switching to looking at the sights. Furthermore, you may not know whether your alignment is off or whether your red dot is turned off or not working.
What this means is that if you do your practice with iron sights in a way that AUTOMATICALLY puts your sights into alignment between your dominant eye and the target, and you use a co-witnessed red-dot, you’re going to have an effortless transition back and forth between irons and red dots.
How do you get a co-witnessed red dot with factory height sights?
It’s harder than you might think.
There are a ton of red dot systems available right now. The 2 gold standards are the Trijicon RMR 2 and the Leupold DeltaPoint…with Holosun picking up steam incredibly fast. It’s relatively easy to get these to co-witness with suppressor height sights, but incredibly difficult, if not impossible, to get them to co-witness with factory height sights.
As a result, I initially went with the JP/Shield JPoint 4 on a slide that I had cut by Lone Wolf Distributors.
Why?
The JPoint 4 sits INCREDIBLY low and the Lone Wolf slide cut is pretty deep. The combination of the 2 let me have a red dot that co-witnesses with my factory height iron sights.
It doesn’t have all of the bells and whistles that other micro red dots have…there’s no switches (it’s always on and you replace the battery every 6 months) and it’s not as resilient to being dunked in water, but it’s ridiculously easy to use and tough when mounted to the slide. It’s NOT a duty/hard use optic, so if you need a duty or hard use optic, go with a more durable optic.
I also have a Romeo Zero, but prefer the JPoint. FYI, that is an incredibly unpopular and “uncool” opinion to have. I probably risk being tarred and feathered in some circles for even saying that.
Regardless of what pistol red dot and mounting option you decide on, the big question is, what’s the best way to get your draw stroke dialed in so you can make a seamless transition from irons to a red dot?
Using traditional training methods, systems, and tools, it’s a hit-or-miss proposition that takes a lot more time, effort, and money than it should.
Fortunately, we’ve got 3 training programs that will help you get the job done..to get you a quick, efficient, and resilient draw stroke in a fraction of the time that it would take with traditional training. I’ve told you about them before…if you have them, you love them, and if you don’t have them, you should 🙂
First off, we’ve got the Draw Stroke Mastery Sub-Second Draw Stroke training. This training will help you shortcut the process of making sub-second HITS from the holster (even concealed). Most people think this takes a lot of time and effort, but that’s not correct. When you train SMARTER rather than harder, you can get this kind of performance in only minutes per week.
Second, we’ve got Automatic Aiming. Automatic aiming will help you shoot a pistol better than you thought possible with both eyes open…even if you’re cross-eye dominant or have visual confusion when trying to aim with both eyes open! Check out the free presentation we’ve got >HERE< that will let you experience some of the benefits of the training…first hand, in real time. It’s unlike any other gun training OR online presentations you’ve ever seen.
Third, we’ve got our Praxis Dynamic Gunfight training that delivers real-world performance beyond any other gun training currently available. You’ll learn how to train so that you build more skill in a fraction of the time and effort than what’s possible with traditional training, so that you’ll be shooting better on the move than most shooters can shoot flat-footed. This training is vital, regardless of how quick and mobile you currently are because the fact is, real-world self defense situations involve movement whether you want them to or not. Check out the presentation >HERE< to see how and why this training is so vital for ANYONE who owns a firearm for self-defense.
As you may have figured out, we are scratching the surface on red dots here. If you’re thinking about making the switch, what questions do you have? If you’ve already made the switch, what was your experience with transitioning from irons to red dots? Fire away by commenting below…
20 Comments
Popi
September 23, 2022What is your opinion about SIRT SPOT sight, which uses an empty ring and the trigger take up laser of SIRT to mimic red dot for dry fire?
Ox
September 29, 2022I have close to a dozen SIRTs, sell a few every week, and have worked with the company for over 10 years, but I am not a fan of the SPOT in it’s current iteration. Right now, in order to see a dot with the SPOT, you need to be pressing the trigger part way and have the take-up laser turned on. I’m not a fan of the fact that you have to take up the trigger slack to see the dot. With a rail-mounted laser, or if the takeup laser had an always-on option, I would LOVE the SPOT. For a SIRT solution, you may want to check out https://chpws.com/product/next-level-training-sirt-training-pistol-optic-milling/#red-dot-type or https://cpcustomguns.com/product/sirt-rds-cuts-red-dot-sight-cuts-optic-cut/ I don’t have any experience with either company and don’t know anyone who has used either company, but I was looking to do what they’re doing if nobody else was doing it…they are 🙂
John Czerwinski
February 28, 2022One of the things that I have done just for my dry fire training is I added a laser to my pistol and have the laser on. The laser is co witnessed with the red dot. What this allows is while practicing the draw and presentation the pistol is always oriented on target and as I present the pistol the red dot is automatically on target. This helps me get to that level of automaticity quicker as I am not searching or trying to make adjustments during the presentation of the pistol. After several dry fire reps with the laser on I turn it off. Normally my presentations are spot on. After doing this for a week I didn’t need the laser. The reps I was building had restructured my presentation to be as good as I was with irons. If I fail to do my dry fire drills and my skill starts to falter I go back and work with the laser.
Ox
February 28, 2022That’s great! The first training that I know of that began to popularize that tact was our https://DrawStrokeMastery.com course. Amazingly enough, as effective as it is, there are almost no instructors teaching people how to use lasers in this way. We lay out a few high leverage training techniques using an always-on laser that you can do with/without a camera that will help with draw & presentation, transitions, and more. If you haven’t checked it out yet, I would.
Ella Starr
July 27, 2021Thank you for talking about the red dot systems available. I want to get a gun this summer. I will actually find a good gun do it yourself upgrade service in my area as well.
Jan Bailey Martin
July 12, 2021Hi Mike,
What’s the best way to practice presentation when first learning Red Dot? What then would you recommend as you progression learning red dot?
Ox
July 14, 2021“Best” is subjective, unfortunately and oftentimes depends on context and application. As an example, a diagonal movement from the holster to the final shooting position CAN be fastest, but it takes more reps to master and the skill decays quicker than an up+out presentation.
I teach the same presentation for irons and red dot, where your presentation automatically aligns the muzzle between your dominant eye and the target and you visually confirm muzzle alignment with either the irons or red dot. You want to progress beyond actively aiming with the irons or red dot, if at all possible because of the additional time that it adds to the process.
The presentation I teach for engaging a target is as follows:
1. Clear cover
2. Acquire a grip on the firearm. If possible, pre-position the support hand at the point in space where the pistol will be when it is horizontal, bladed away from the body, ready to accept the pistol.
From here, there are slight variations based on the method and location of carry. The following is for a 3 o’clock, strong-side-hip carry.
3. You want some forward pressure between the slide of the pistol and the holster as the muzzle leaves the holster.
4. When the muzzle leaves the holster, you want to lock your wrist and elbow and rotate around the shoulder until the pistol is horizontal, pointed at your intended target (or low ready), underneath your dominant eye, and you acquire a support-hand grip.
5. The shape of the presentation from this point on is like an upside-down, sideways hockey stick. You keep the slide level, bring your irons/dot up into your line of sight while pushing out slightly, and then push out while keeping the irons/dot in alignment with your intended target.
As you speed up, visual perception changes, corners get rounded, and things blend together to the point where you decide to shoot and the next thing you know, the irons/dot is in alignment, ready to shoot.
k moore
July 9, 2021Hi Ox:
What’s wrong with a simple laser??
And the gun still fits my holster…………
Ox
July 9, 2021Nothing is wrong with a simple laser 🙂 I have a light/laser combo on my bedside gun, an integrated laser on one of my carry pistols, and an IR laser on a suppressed pistol.
The one thing that I’d say with lasers is that you want to have it grip activated rather than with a switch in front of the trigger guard. If you have a switch in front of the trigger guard, you want to have one that goes up & down rather than pushing in.
Alexander Livinsky
July 5, 2021Hello,
I have a question about Dry fire.
Is it healthy for the the mechanism of the firearms to pull trigger on the strike fire or hammer fire in the pistols or revolvers without rounds?
Thank you
Alex
Ox
July 10, 2021Great question. I want to refer you over to an article that I wrote on that here: https://dryfiretrainingcards.com/blog/will-dry-fire-hurt-my-gun/
In short, EVERY mechanical action will cause some wear. Some things will cause parts to wear after 10s of thousands of reps, and others will cause parts to wear much, much quicker.
I suggest that when people are doing dry fire with an actual pistol (as opposed to a training platform) that they either use dry fire cord so that the firing pin is not going forward each time, that they use a snap cap, or that they use a dead trigger the majority of the time.
Philip
April 20, 2021Extremely informative! After reading, I went to my dry fire area and really noticed a major difference with the presentation techniques discussed. One thing that keeps me scratching my head is how do you find the red dot in a low light/no light scenario? With iron (night)sights, I was always able to at least orient my handgun (or locate it) in the dark… now that’s not an option with blacked out aftermarket back-up iron sights. Is there a method to this madness… unlike with a red dot on a long gun, there are no real reference points (shoulder and cheek weld) that allows a pistol with a red dot to be oriented properly in the dark…
What say you?
Ox
April 20, 2021Excellent question and you actually answered the question with your comments about being able to find your irons. In order for a red dot to make sense for self-defense, you really want to have a presentation that is automatic enough that you never have to “find” the dot.
“Finding” the red dot is a VERY common issue and it’s an indication that the shooter is probably going to be better off with irons or a laser until they refine their presentation so that it automatically delivers their sights/laser between their dominant eye and the target.
Lighting is another factor…either handheld, weapon mounted, or ambient. You really need light to identify your threat and that eliminates a lot of what-if scenarios.
But, at the core, your question highlights the fact that red dots tend to provide, at most, a 10% improvement in performance for top shooters and make a lot of shooters slower…even if they can be more accurate if they have enough time.
Mike
April 10, 2021Everything said in the article is what I have experienced since getting a red dot on my pistol. From my (limited) experience, the solution presented appears to be the best option.
Mike
September 21, 2020Very good article Ox. It sounds like you are not a fan of only having the red dot visible / no co-witness. Is that because you want to see the sights during presentation? I just wondered if — with enough practice — the dot would automatically appear during a “good” presentation enough so that you don’t even need the sights. I seem to remember one shooter who even removed the sights entirely from his Glock during a training course, and he did very well. I think he did it just to prove a point that you can aim adequately without seeing sights.
Ox
September 21, 2020Hey Mike, I apologize if anything I said made you think that.
When I’m shooting a gun with a dot, that’s all I use.
I mounted the red dot behind the rear sight (between my eye and the rear sight) so that it would be less of a distraction and covered the fiber on the front with paint/whiteout so that it isn’t visible unless I make a point to look for it.
The key to the way that I did it is that I’m not aiming with the sights or the red dot…my presentation does that. All I’m doing 99% of the time is verifying sight alignment.
It’s true that if you put enough time in with the sights, you don’t need them, but people make a HUGE mistake of trying to shoot without the sights too soon and not shooting with their sights even after they’ve developed the ability to make fast, accurate hits without their sights. Practicing sighted shooting is the key to making fast, accurate hits with or without your sights or an optic, no matter what point in their lifecycle as a shooter that someone is.
Mark
July 7, 2020Ox, it looks like you have your rear sight mounted in front of the optic on your Glock 26 (race mount?). Is that your suggested optimum position for it? I really like your thought about all your common pistol grip angles (e.g., Glock) having all RDS or all iron. Makes a lot of sense, especially when using a SIRT for dry fire practice.
Also, do you use your SIRT with suppressor height sights and add a RDS, or just use iron suppressor sights on it?
Ox
July 7, 2020Hey Mark, great questions. I had to cut stuff off about 10-20% of the way through what I wanted to say 🙂 Yes…I have the sights mounted in front of the optic. There are some silly names for the different mounts…”Combat”, “Race” etc. and I know that the mount orientation I chose is designed for competition/sport, but that’s not why I did it. Here were my big considerations…
1. I’m not planning on taking the optic off of that slide. I have another Glock 26 slide with iron sights. The slide with the optic is now my optics slide and the iron sights are merely backups. I have those particular sights on the slide because they are my least favorite night sights. If I were going to be switching back and forth on the same slide, I would have kept the traditional rear sight groove.
2. I really don’t want to see or be aware of my iron sights unless the optic is not visible (either because of alignment or failure). Putting the sights in front of the optic makes them easier to ignore.
3. The JPoint 4 has a rear sight notch that works better with my front sight than the actual rear sight that’s mounted in front of the optic.
4. Having the red dot mounted a “little” bit further back gives me a few more options on the holsters I can use.
If you’ve got 2 slides and can designate 1 as an optic slide and 1 as an iron sight slide, then I believe it’s a good call to mount the red dot as far back as possible and the irons in front. If you only have 1 slide that needs to do everything, then I would mount the optic in front of the rear sight.
Since my optic is set up at factory sight height, I’ve got factory height sights on all of my Glocks…whether real steel or trainers like the SIRT.
Gene
July 6, 2020Just completing Praxis. I am looking at red dots. Lots of questions.
1. I only have one gun for carry/home/dry fire (Glock 19 Gen5) so seems like suppressor height sights aren’t an issue?
2. Still want red dot low, so do I have the current slide cut, or get a precut slide? Not sure what choices are out there yet.
3. Front runner still seems to be the Trijicon RMR 2. Pricey, but rugged and torture tested.
Ox
July 6, 2020Hey Gene, let me know how Praxis went for you when you get a chance 🙂
On to your questions…
1. You’re correct. There are slightly fewer holster options for suppressor height sights, but most red dot compatible holsters allow for suppressor height sights. The only caveat is if you decide to get a SIRT, airsoft, or CO2 trainer. In that case, you may want to do a google search for “airsoft glock suppressor sights” and pick up a cheapo set of suppressor height sights for your non-gun.
2. I had multiple Glock 26 slides, so I had one cut. For my 19, I’ve gone back and forth between buying a 2nd 19 and getting either the Brownells or Lone Wolf pre-cut slide so that I can switch back and forth easily. The challenge/problem is that most slides seem to cost as much as a new MOS Glock.
3. Awesome optic. I had a very specific set of criteria so it didn’t work for me, but they are a proven winner.
Leave A Response