One of the widespread myths of self-defense shooting is that you need to have the right stance.
It’s not a myth for bullseye, precision rifle, big bore, or long range pistol…
And it’s not a myth for newer or less experienced shooters…
But it is just a distraction for self-defense shooting.
How can that be?
Well, the context is different.
When the situation allows you to get a perfect stance, by all means, take advantage of it.
A proper stance makes it easier to line up your sights automatically.
A proper stance helps you manage recoil more efficiently.
But you want to move beyond shooting with a perfect stance.
Because, if your ability to hit a target depends on a perfect stance, it makes your technique fragile and more likely to implode in a real world situation.
What we want is resilient skills that will work in the real world.
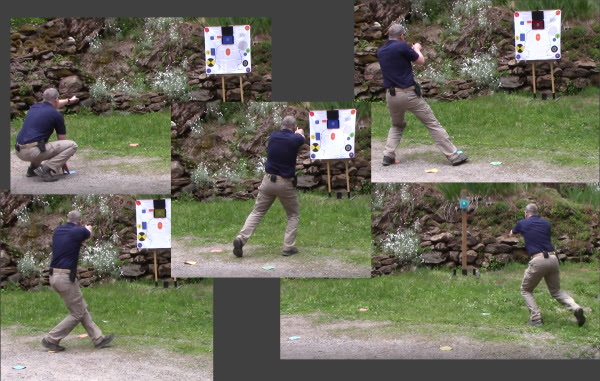
In a self-defense situation where you may be off-balance, recoiling from a strike or engaging a threat at an odd angle, it may take you a quarter second or more to get a good stance…
…and that’s the difference between getting 1 hit on target and 2 hits on target in the same amount of time.
…or getting a hit on your attacker before they’re able to strike you again or get another round off.
In a fight for your life, you need to be able to win with the hand you’re dealt instead of the hand you wish you had.
And that means doing the majority of your training without a proper stance.
By all means, start off with a few reps with a perfect stance…and I even suggest ending with a few reps with a perfect stance…
But the bulk of what you do in between should be without a proper stance.
Here are 3 basic modifications you can do during dry fire and eventually live fire to make your training MUCH more resilient.
They all take advantage of something called “compass drills” where you move in the 8 directions of the compass…N, NE, E, SE, S, SW, W, NW with North being the direction towards your dry fire target.
- Leans. Lean in each of the 8 compass directions one at a time, draw, present, and do one dry fire rep. Start by leaning, THEN drawing and progress to drawing and presenting as you’re leaning. Try it with your feet together and feet apart.
- Lunges. Lunge in each of the 8 compass directions, draw, present, and do one dry fire rep. For straight forward & straight back, try lunging with both the right and left foot. This will give you 10 reps instead of 8.
- Turns. Face each of the 8 cardinal directions, rotate your body without moving your feet as you draw, present, and dry fire engage your target. If you must move your feet, see how little you need to move them to make the shot.
As you’re doing these, you want to make sure that you don’t move into pain, aggravate an old injury, or push yourself so far outside of your comfort zone that you fall into something…in fact, that’s one reason why we want to do them with dry fire.
Here’s the crazy thing…you can combine each of these to give you 8x10x8=640 different combinations!
Why’s that important?
It’s important because the variety and challenge will stimulate your brain more and cause you to learn quicker and with less effort.
AND
If you ever find yourself shooting from one of those awkward positions in a situation where lives depend on your performance, it won’t be the first time…your brain will already know what to do…how to create a stable shooting platform in an unstable situation.
The more you get comfortable with it in practice, the more natural it will be at full speed when lives are on the line.
I encourage you to try out a few of those combinations (right now if you’re at home) and let me know how it goes.
If you like the idea of training smarter and building more skill in less time–training in a way that will help you build better real-world skill–what I shared with you is barely the tip of the iceberg.
I’ve got a presentation that I want you to watch that goes much, much deeper into steps you can take to make your at-home training WAY more effective than the majority of paid, professional, in-person training being offered today.
You can check it out now by going >HERE<
(A lot of people have watched it 5 or more times because of how valuable the information is)
You’ll learn a proven step-by-step process to build real-world shooting skills in the comfort of your living room, basement, or garage…better skills than you can get at a traditional range.
This is the PERFECT way to train while things are a little crazy and you’re spending more time than normal at home…and before they go really crazy.
The presentation is free, but seats are limited, so sign up now by clicking >HERE<
*BONUS* Here’s a little neurology bonus for you. On the turning drills, you may find that you can’t do them when you’re turned more than 45 degrees from the target.
This is common, but not desirable for most people.
Your lower body is designed to work independently from your upper body…your lower back, mid back, and upper back SHOULD all be able to point in different directions and you SHOULD be able to maintain balance with your feet, knees, hips, chest, face, and eyes pointed in different directions. (This may or may not be the case for people with implants, prosthetics, injuries, instabilities, or who have had bones fused)
At first, doing these drills may cause your brain to smoke and for you to sweat and possibly breathe hard, despite the fact that you’re not doing any “real” work. That’s because they can really challenge parts of the brain that are underused by most people…but that are vital in a real-world shooting situation.
As far as what part of the brain…when you’ve got different parts of your spine pointing in different directions, the cerebellum is doing a lot of the calculating to figure out how to help you keep your balance and keep from falling. If these drills are too much of a challenge, it may be a sign that you could benefit A LOT from drills that are focused on cerebellum activation.
Leave A Response